
Marker totals below describe the supplied map index, rather than a live count. Filters and available markers can change as the map is updated.
The RuneScape Dragonwilds map covers Ashenfall’s explorable world, including quest markers, resources, vaults, enemies, fishing spots, travel points, and collectibles. The quickest way to find anything is to hide every marker, enable only the category you need, add the relevant travel markers, and then inspect the terrain between your starting point and destination.
The main limitation is that a marker tells you where something is, not whether you are ready to reach or use it. Your equipment, gathering tools, skills, crafting stations, quest progress, and regional hazards still determine whether a route is practical. The Scorned Wilderness raid is another exception: its entrance appears on the world map, but the instanced raid interior is not displayed as a normal explorable map.
What the Dragonwilds map covers
The primary map is the Ashenfall surface. It connects the regions used throughout the main journey, including early areas such as Temple Woods and Bramblemead Valley and later destinations such as Fell Hollow, Dowdun Reach, and Umbral Sands. The map also distinguishes the Dowdun Underground from the surface, which matters because its travel network and markers are not interchangeable with overworld locations.
| Map area | What it shows | Important limitation |
|---|---|---|
| Ashenfall surface | Regions, roads, quests, resources, creatures, vaults, fishing spots, collectibles, and travel markers | A visible destination may still require better gear, tools, skills, or quest progress |
| Dowdun Underground | Underground locations and the separate Nodestone network | Surface markers do not explain underground connections |
| Scorned Wilderness | The raid entrance on the world map | The instanced raid interior is not shown |
The current map data also includes post-launch additions such as the 1.0 world-map art, new open-world creatures, another vault door, and an additional dungeon entrance. This makes an updated map substantially more useful than an older Early Access image, especially when planning routes through regions that changed or expanded before full release.
A static overview is useful for learning the shape of Ashenfall, but the interactive filters are what make the map practical. There are too many individual markers to read comfortably when every layer is active.
The fastest way to find a location
Use the same short process whether you are searching for a quest destination, a material, a vault, or a collectible.
- Define one target before opening filters. Search for a named material, NPC, quest, creature, or point of interest instead of browsing every category at once.
- Select the correct map layer. Confirm whether the destination is on the Ashenfall surface or in the Dowdun Underground. A correct marker on the wrong layer will not help you build a usable route.
- Hide all markers. Starting from an empty map prevents dense categories such as trees, common stone, enemies, and treasure chests from covering the terrain.
- Enable the target category. Turn on only the specific resource, quest, NPC, vault, fishing tier, or collectible you need.
- Add travel markers. Enable Lodestones, Nodestones, or teleporters as appropriate. These reveal useful starting and return points without filling the map with unrelated objects.
- Inspect the terrain and surrounding threats. Roads are not the only consideration. Cliffs, ruins, water, hostile camps, regional hazards, and underground transitions can make the visually shortest line a poor route.
- Plan the return journey. Gathering is only productive if you can carry the materials home. Leave room in your inventory and identify the nearest usable return point before departing.
- Check non-map requirements. If the destination belongs to a quest, vault, dangerous region, or higher material tier, verify the relevant progression requirements before committing to a long trip.
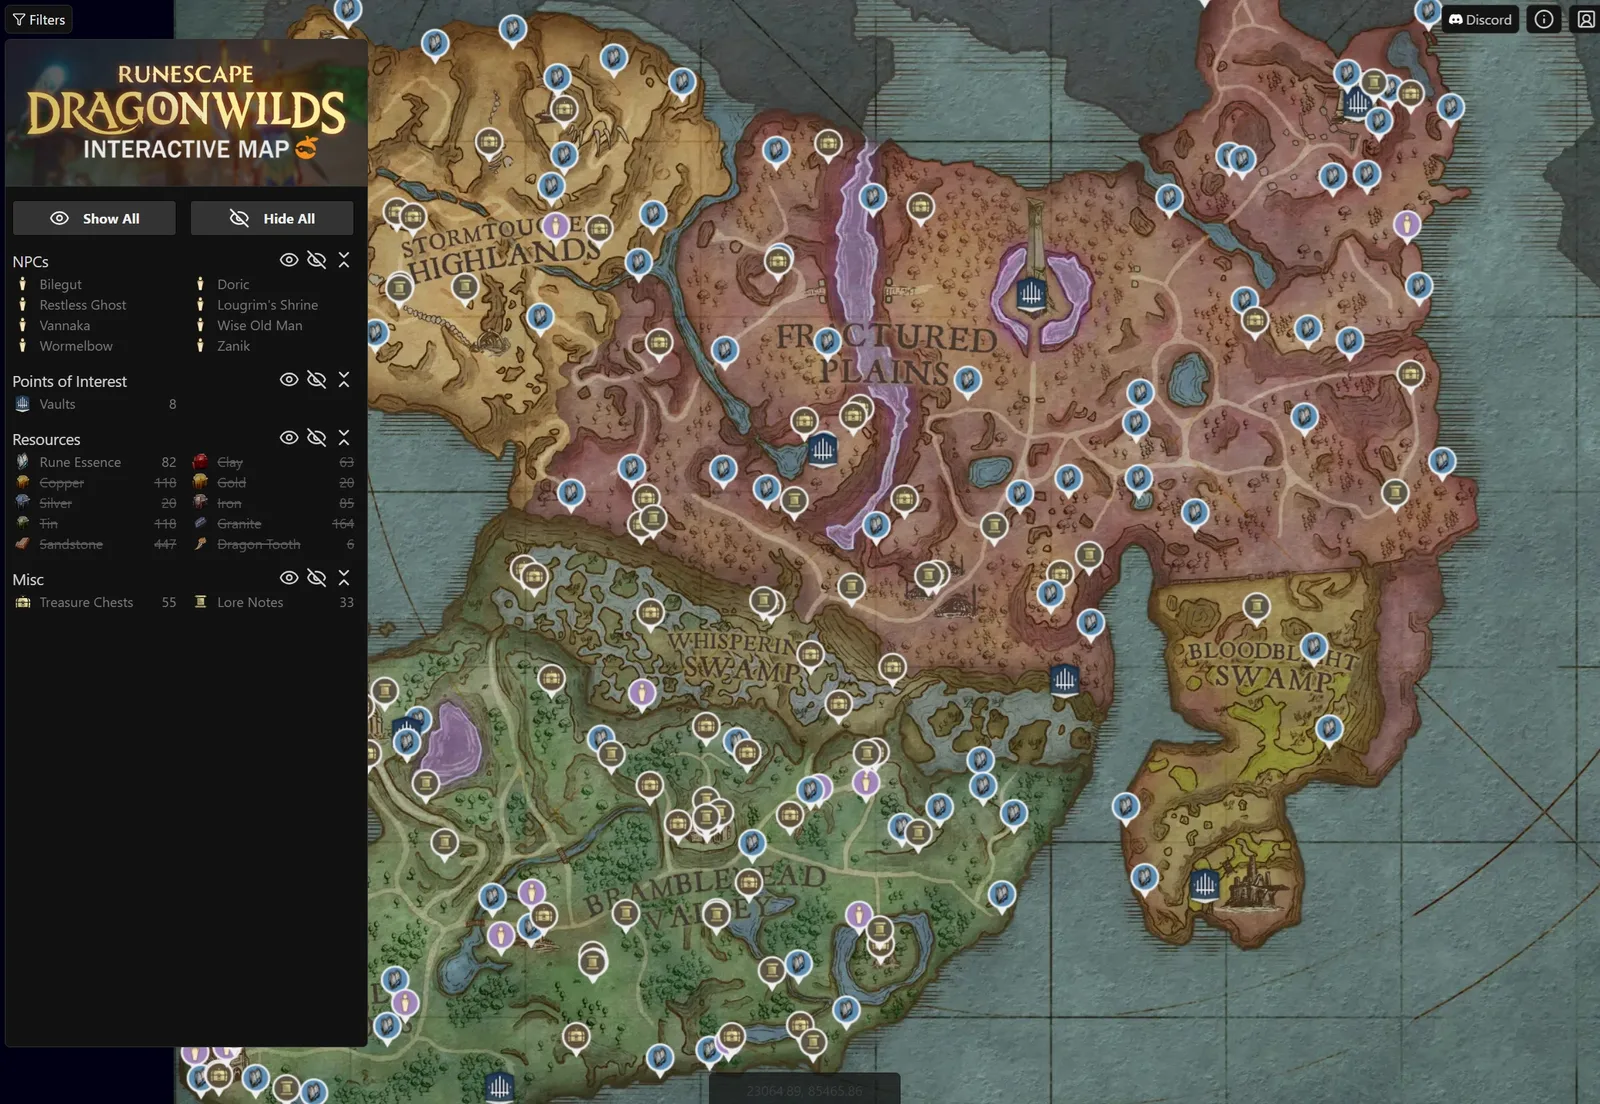
The sidebar shows category filters for locations, resources, chests, and other markers.
Map filters and what they are for
The map separates locations by purpose. Choosing the right category is more reliable than scanning icons manually.
| Filter group | Examples | Best use |
|---|---|---|
| Quests | Primary, secondary, and tertiary quest markers | Finding a quest start, objective area, or related NPC |
| Points of interest | Vaults, Sanguine Urns, Nightmare Crucibles, lore notes, recipe books, Anima Vents, and treasure chests | Exploration, permanent upgrades, recipes, challenges, and collection runs |
| Navigation | Lodestones, Nodestones, teleporters, and agility courses | Choosing a departure point, underground connection, or return route |
| NPCs | Merchants, quest characters, councillors, elders, and other named characters | Starting quests, returning objectives, or locating services |
| Trees | Ash, oak, willow, maple, yew, magic, and Blightwood | Woodcutting trips and material planning |
| Ores and metals | Copper, tin, iron, coal, gold, silver, mithril, runite, Rune Essence, and other deposits | Mining routes and equipment progression |
| Fishing spots | Separate net and rod markers across multiple tiers | Finding the correct fishing method and regional catch area |
| Gatherables | Flax, mushrooms, berries, herbs, vegetables, cactus plants, and swamp materials | Farming ingredients, food, crafting materials, and potion supplies |
| Important mobs | Dragons, Abyssal Demons, named enemies, and other major threats | Avoiding dangerous areas or locating a specific encounter |
| Mobs | Common wildlife, undead, Garou, goblins, Kalphites, and regional enemies | Planning safer travel or finding repeatable enemy materials |
Some categories are extremely dense. The indexed map contains thousands of Ash Trees, Stone deposits, and Sandstone deposits, alongside hundreds of treasure chests, lore notes, common creatures, and resource nodes. Showing all of them at once hides the geography that you need for navigation.
Use broad groups only to discover what a region contains. Once you know the target, switch to its individual marker. For example, an ore-and-metals overview can show that an area supports mining, but an Iron-only or Runite-only view is better when the trip has one crafting objective.
Travel markers and underground navigation
Ashenfall uses more than one type of travel marker. The map index distinguishes three mapped Lodestones, 18 Nodestones, and 11 teleporters. These counts describe different networks rather than interchangeable versions of one object.
Lodestones belong to overworld route planning. Nodestones are the Dowdun Reach fast-travel network and should be read separately from surface travel. Teleporters form another location category and may help connect a route, but the presence of a marker alone does not establish that it is already usable in your current progression state.
A practical route normally uses three points:
- Departure point: the closest travel marker you can currently use.
- Target cluster: several nearby markers for the same material or activity, rather than one isolated node.
- Return point: a known route back to storage and crafting stations before your inventory becomes a problem.
Do not place every resource and travel filter on the map simultaneously. Enable the travel network first, add one target, and compare the resulting clusters. This makes it easier to see whether two nearby markers are genuinely connected by passable terrain.
The map can support Lodestone planning, but it does not decide the best player route or placement by itself. That decision depends on your base, current progression, repeated farming targets, and how much of the world you have already opened.
Planning resource runs without marker clutter
Resource filters are most useful when treated as route-building tools rather than encyclopedic lists. The map index includes 601 Rune Essence markers, 207 Iron markers, 30 Gold markers, and 28 Runite markers. Tree filters range from thousands of common Ash Trees to much smaller groups such as 21 Blightwood and 19 Magic Trees.
Those totals explain why filter discipline matters. A common-resource layer can blanket the map, while a rare-resource layer may show only a few useful clusters. The correct workflow changes with that density.
For a common material:
- Enable only that material and your travel network.
- Ignore isolated markers unless they fall directly along an existing journey.
- Choose a cluster near a usable departure point.
- Consider where the material will be processed after the trip.
- Leave enough carrying capacity for the run to be worthwhile.
For a scarcer material:
- Inspect every visible cluster before choosing a destination.
- Compare the surrounding enemy and region markers.
- Confirm that your current tool can gather the material.
- Mark unreachable deposits for a later return instead of forcing the route.
- Combine nearby secondary objectives only when they do not distract from the main material.
Finding a new material does not guarantee that you can immediately turn it into equipment. Higher-tier resources may also depend on the correct skill level, recipe, tool, or crafting station. Bring newly discovered materials back to your base and check the station associated with them, because interacting with the correct station can reveal additional recipes.
Using the map for vaults, chests, and collectibles
The points-of-interest filters include 15 vaults, four Nightmare Crucibles, Sanguine Urns, 17 unique recipes, five recipe books, 13 Dreaming Stone Shards, and 292 treasure chests. The map also tracks lore notes, Garou Artifacts, spectral locations, dragon teeth, ravens, nature spirits, and other exploration targets.
These markers solve different problems:
- Vaults identify entrances, but they do not replace preparation for the enemies, puzzles, or progression checks inside.
- Treasure chests are useful as secondary stops. Building an entire route around a single chest is rarely efficient unless that chest contains a known target.
- Recipe markers help locate specific unlock opportunities, but the map position does not explain every prerequisite.
- Sanguine Urns belong to permanent-health collection, so they are better approached as a dedicated collection task than as random detours.
- Nightmare Crucibles are challenge locations. Their markers establish where they are, not which trial or reward best suits your current equipment.
- Lore notes and artifacts are dense collection categories. Activate them region by region instead of showing the entire world at once.
When clearing collectibles, finish one region or one marker type at a time. Mixing chests, lore, urns, recipes, and artifacts creates an inefficient route and makes it harder to recognize what you already collected.
Using quest and NPC markers correctly
Quest markers are divided by quest type, while NPC filters identify named characters separately. Enable both when you know the quest name but not whether the next step belongs to a place, an objective, or a person.
Mapping the Sands I shows why this distinction matters. The quest begins with the Moon Sprite Shaman Anamcara at Alcarrid Camp in Umbral Sands, next to the pond. It requires partial completion of Icthlarin’s Little Helper. The quest objective concerns Moon Sprites on tall locations around the camp. A map can identify the camp, the NPC, and the surrounding objective area, but it cannot replace that prerequisite or explain the full quest sequence through a single marker.
For any quest route:
- Enable the named quest and relevant NPC layers.
- Identify the start point and the region containing the next objective.
- Check whether the route crosses a region above your current equipment level.
- Add only the travel markers needed for the outward and return journeys.
- Follow the quest’s instructions once you reach the marked area instead of assuming the icon represents the exact interaction point.
Avoid enabling every quest simultaneously. The map index contains primary, secondary, and tertiary objectives from many different progression stages. Seeing them all does not tell you which objective is appropriate for your current character.
Common map mistakes
Treating the map as a progression guide
A marker confirms location, not readiness. If enemies or the region display a much higher power level than your equipment, reaching the icon may not be enough. Your tools, skills, recipes, and crafting setup need to progress alongside exploration.
Using an outdated world image
Older maps may omit Dowdun additions, Umbral Sands content, 1.0 creatures, the Scorned Wilderness entrance, or renamed targets. Use a map that displays the 1.0 world art and separates the Dowdun Underground from the surface.
Leaving every filter active
Dense categories obscure roads, region boundaries, water, and terrain. Hide all markers, then rebuild the view around one objective.
Confusing Lodestones with Nodestones
Lodestones support overworld planning, while Nodestones form the Dowdun Reach network. Select the network that belongs to the active map layer.
Expecting an instanced raid map
The Scorned Wilderness raid entrance is marked, but its interior is not presented as a normal world-map region. Use the world map to reach the entrance, not to navigate the complete raid.
Choosing the shortest line instead of the safest route
A direct line may cross hostile camps, difficult terrain, regional hazards, or an underground transition. Compare enemy, navigation, and terrain information before leaving.
Ignoring the return trip
A productive cluster can still be a poor farming route if you fill your inventory far from storage. Decide how you will return before starting the run.
Route-planning checklist
Before leaving your base, confirm the following:
- The map is set to the correct surface or underground layer.
- Only the target and necessary travel filters are active.
- Your gathering tool can collect the selected resource.
- Your power level is suitable for the destination region.
- Required quest progress or crafting access is already complete.
- Your inventory has room for the expected materials.
- You have identified both a departure point and a return route.
- The route does not depend on seeing the Scorned Wilderness raid interior.
- Optional chests or collectibles are close enough to justify the detour.
The RuneScape Dragonwilds map is most effective when it answers one question at a time. Reduce the view to a single objective, build a route around the correct travel network, and use progression information to decide whether the marked destination is useful now or should be saved for later.